Track Light Price,Outdoor Track Lighting,Commercial Track Lighting,Led Track Lighting Systems Jiangmen Liangtu Photoelectric Technology Co., Ltd. , https://www.liangtulight.com Part 3: Resetting our settings Before we start, we have to reset some settings to their default values.
Step 3.1: On your display, set the RGBLowend and RGBHighEnd controls to their preset values. If your monitor has a 6500K setting, you can simply select it to complete this step. If you have never used the RGBLowend and RGBHighEnd controls in your monitor, it is possible that they are already set at the default value. Don't worry if you don't know any presets. They are not that important because we will adjust them later.
Step 3.2 (CRT projector only): Adjust the electronic focus of your blue tube to the sharpest image quality (you may have already done this when you first installed the projector). If your CRT projector has a blue auto defocus option, turn it on, which will help you in the grayscale of the bright zone (70-100 IRE). .
Step 3.3 (CRT projector only): Make sure that the G2 (also known as 'Grid 2') of each tube of your projector is set correctly. Usually there is a G2 adjustment knob for each tube in the projector. Check your user manual to confirm the steps to set up G2. The G2 control sets the point at which each tube 'starts' or 'starts to illuminate'. It is important to have three tubes simultaneously start the gray level for the dark part. You can test the disc's all black (0 IRE) test pattern by displaying Digital Video Essentials: HD Basics on the display, then slowly adjust the brightness control to see if the 3 tubes are brightened together. You can find this test pattern from the menu option "Complete Program Menu" -> "Advanced Video Test Patterns" -> 1080p or 720p -> "Video Black w/ new PLUGE". Confirm that the three tubes are lit at the same time. If you are not sure what this step means or don't want to adjust the projector all the time, don't worry about the G2 adjustment. G2 can sometimes be set quite close to correct.
Part 4: Setting the white level (comparative)
The contrast setting controls the peak light output or illumination of your display. As mentioned earlier, a contrast setting that is too low can result in a dull picture, and a contrast setting that is too high can cause white details to become completely white (white saturated) or cause blooming/smearing. Contrast affects all colors at the same time.
For setting comparisons, some manuals will tell you to display both the 100 IRE white test pattern and a white pattern slightly below 100 IRE, then increase the contrast control to show the maximum of both, or the test pattern begins to become Thicker (starting 'bloom'). This is not a good way, because (a) some monitors will show separate test patterns even if they are set at 100% contrast, (b) if you compare the control settings too high, it will be difficult to get flat gray. Levels, and (c) contrast control settings are too high can cause eye fatigue.
The correct way is to set the contrast control to a reasonable range based on the design of the room, the ambient light, and your display type. The light output is measured with foot lamberts or ftL, and the target ftL value will vary depending on the display type. You should try and set the following values: Welcome to China Home Theater Network
Projector (CRT and digital): 12-16 ftL*
Direct view display (image tube, plasma, rear projection, flat, etc.): 30-40 ftL
*Because CRT projectors are better than most digital projectors, if you are in a room with light control (to minimize reflected light), even at low brightness output, like 8-10 ftL, you Still get good performance. Lower-order CRT projectors may not reach 12 ftL without image softening or blooming, in which case you should reduce the contrast control to the point where the image is still sharp.
Step 4.1: Open a new calibration file in ColorHCFR. This file will store all your "corrected" readings so that we can compare them to the "pre-corrected" readings we have previously stored. In ColorHCFR, select the menu option "File-> New" to open a new calibration file, then select "Eye One" or "Spyder II" according to the sensor type, then select "DVD Manual", and finally press "Finish" .
Step 4.2 (Spyder2 only): Make sure the sensor's read time is set correctly (it won't change when you open a new file, but it's better to check it). Select the menu option "Measurements -> Sensor -> Configure". Confirm that the "Read Time" is set to a preset value of 300 ms. Confirm that the check button "Extend read time on dark measurements" is selected, then press "OK".
Step 4.3: Select Digital Video Essentials: HD Basics disc menu option "Complete Program Menu" -> "Advanced Video Test Patterns" -> 1080p or 720p -> "Window 100% level w/ new PLUGE" jump directly to the 100 IRE window test pattern. It looks like this: 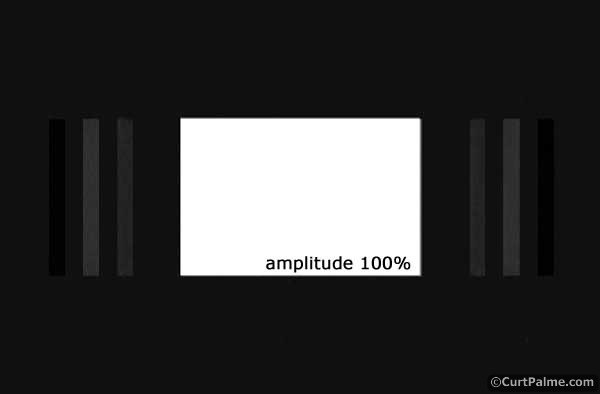 Â
Â
If you use a different test disc, your test pattern may or may not have a dark gray PLUGE pattern on both sides, that has no effect.
Step 4.4: Start reading continuously by pressing the green triangle: 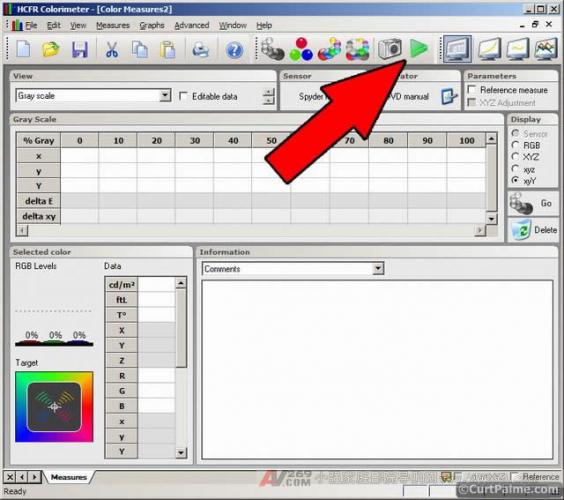
You should see the data in the "Selected color" window in the lower left corner updated every 3 seconds: 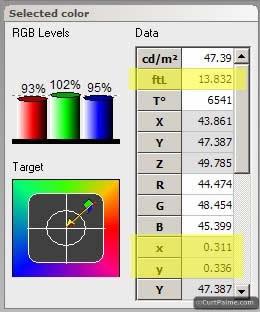
The only thing we care about right now is the Y value. ColorHCFR conveniently displays Y (illuminance) readings and converts them to ftL (the yellow-marked portion). In this example, we see that the Y value is 47.387 or 13.8 ftL.
How many ftL do you read? If it is within the target range of your monitor (the projector is 12-16 ftL and the direct view monitor is 30-40 ftL) that's fine! If it is below range, then try Adjust the contrast control, and remember that too high a setting will cause some problems, and not every projector can achieve this goal, especially if it is very old or your screen is particularly large. You have to judge for yourself, and don't care too much about your readings.
If your reading is higher than the maximum, you may want to consider reducing the contrast control. In a fully light-controlled room, even the minimum value will be very bright.
Important: Remember that the target range only applies to window test patterns (usually 10-18% of the picture size). Especially for CRT and plasma displays, because the ftL light output of the full-screen white test pattern is not as high as the window test pattern, it is usually about half. If you use a full-screen test pattern on a CRT (rear projection TV and projector) or plasma display, the calibration results will be incorrect.
We have now correctly set our initial contrast control settings. When we set other controls later, the setting will change, so now don't care too much about the exact value, just set it to a reasonable value. Welcome to China Home Theater Network
Part 5: Setting the black level (brightness control)
Brightness control adjusts the black level of your display. In other words, it sets the darkest object to an invisible level. As mentioned earlier, setting too low will cause dark details to become black. Setting too high will cause black to turn gray. Brightness control affects all colors at the same time.
Setting the brightness control is quite straightforward:
Step 5.1: Each test has a test pattern called PLUGE (short for "Picture Line-Up Generation Equipment" because it was used to produce grayscale test test patterns). They all have a bar graph that is 'blacker than black', a black bar chart (usually the background) and one or two bars that are 'lighter than black'. On the Digital Video Essentials: HD Basics CD, select the menu option "Complete Program Menu" -> "Advanced Video Test Patterns" -> 1080p or 720p -> "Video Black w/ new PLUGE" and jump directly to the PLUGE test pattern.
The Digital Video Essential disc has a bar that is 'blacker than black' and two bars that are 'lighter than black', as shown below: 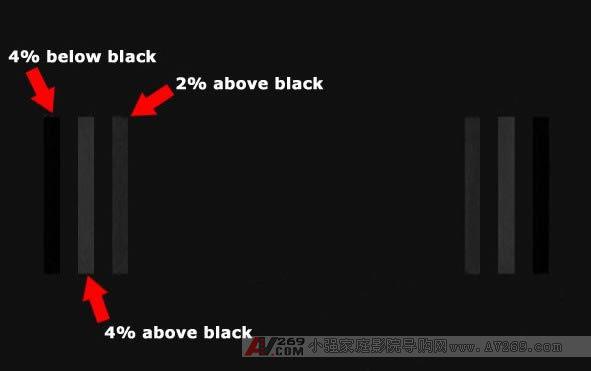
Note: You may not see a 4% black (blacker-than-black) bar chart below your black. Not all settings will display 'blacker than black' (or 'whiter than white'). If you don't see the content, it means that your system has a smaller video range, and normally you won't lose any details.
However, in the Digital Video Essentials: HD Basics test disc, all grayscale window test patterns from 0 to 100 IRE have PLUGE test patterns on both sides. We use the blackest (0 IRE) pattern to make the PLUGE test pattern easier to see.
Adjust the brightness control of your display until 2% of black is almost visible, while 4% below black is invisible. (4% above black is only for reference here). That's it, it's very simple! 4% below black should not be seen because it is below black. If you adjust the brightness control so high that the 4% bar chart below black is visible, your black level is too high, and the black part of the image should be grayed out. Welcome to China Home Theater Network
For users who want to use advanced methods that are less subjective, there are actually more precise ways to set brightness control:
As described in the previous section, set the contrast control with the 100 IRE window test pattern and record the Y value (light output).
(Spyder2 only) Go to the "Measurements -> Sensor -> Configure" option. Temporarily increase the reading time of the sensor to 2000ms by going in the
A 10 IRE window test pattern is displayed.
Adjust the brightness control so that the Y reading in the 10 IRE window test pattern is as close as possible to 0.65% of the 100 IRE white test pattern Y reading. For example, at 100 IRE we measured the Y value to be 47.387. 0.65% of this value is 47.387 x 0.0065=0.38. We therefore have to adjust the brightness control until the Y value is 0.308.
This will set your gamma to 2.2 with a 10 IRE window test pattern, as explained above for a perfect gamma value. In most cases, this will be the correct brightness control setting. If your monitor has unusually high or low gamma or non-linear gamma, this method may give you the wrong result, so you can't see a 2% or 4% PLUGE bar graph (black saturation) ) or the black background is too gray. In this case, the conventional manner of adjusting the brightness control with the PLUGE test pattern as described above may be appropriate.
We have now correctly set our initial brightness control. This setting may change slightly when we set other controls, so we have to retest it later. You may gradually understand that because each control affects other control settings, the appropriate gray level is a repeating process!